Young Hottie’s Hot Choccie

“In 2016 it is my mission to improve the condition of my skin, nails, hair and creative brain NATURALLY. I have spent a small fortune on all sorts of lotions and potions and never found that ‘magic tonic’. So I’m putting away my wallet and getting out my mixing bowl. Through exploring my love of healthy dessert making, I will be feeding myself beautiful (hopefully). Follow my diary of tailor made desserts, baked snacks and Breakfast recipes for clear skin, glossy hair and hard ass nails. Starting with…” 

IMG_7151

THE FACE – Anti Aging

Young Hottie’s Hot Choccie aka Anti Aging Hot chocolate

Turning hot chocolate into an anti-aging elixir.

There is nothing on earth I find more huggable than a mug of streaming hot chocolate. An elixir of the gods type stuff. On my mission to #feedmebeautiful I am interested in turning my old favourites into natural beauty must haves and looking to share my anti-aging recipes. When thinking of anti-aging recipes about 100 different skin brightening, plumping, skin protecting smoothies come to mind, but when returning home at the end of a long day, out of the dark and the cold I want comfort. I want chocolate!

IMG_7152

 With this anti-aging food mission in mind I have whipped you up a super thick, velvety, indulgent, anti-aging Hot chocolate to warm your cockles, super charge those feel good endorphins and de-stress you after a long hard day (all of which is clinically proven, hazzar)!

IMG_7150

This recipe was inspired by Jamie Oliver’s – Ultimate Hot Chocolate – a blend of dark chocolate, icing sugar, corn flour and Horlicks ( which sounds rather amazing actually, but not a an anti-ager I’m reckoning).  As you may well know Jamie Oliver is on a Superfoods, no refined sugar mission of his own and I like to think this is a recipe he would approve of!

IMG_7149

*Chocolate is a bit of a press floozy. In the news its seems we are constantly changing our minds about whether its good for us or not. The answer is simple – Cocoa is full of all good things we want in our lives, but the added sugar and fat is not, BOO! BOO!

In this recipe I have enlisted the help of dark chocolate (Cacao), Coconut cream, Cayenne pepper, Ginger and Cinnamon (to name but a few) all of which will help kick some serious wrinkle butt!

*In this recipe we will be using Cacao or if you don’t have it 100% Best Quality Dark Cocoa will do just fine. I like Green & Blacks.

* If you’re not a fan of coconut don’t worry you actually can’t taste it but you get all it’s anti-aging beauty benefits.

IMG_7133

It’s entirely possible I may have gone a little over the top with all the toppings!

IMG_7135

To justify my toppings = Sunday afternoon. Icy cold. After lunch in Borough Market we had these hot chocolates as dessert.

Feed me beautiful facts  – What’s it good for?

Cacao – Hydrates the skin to keep it youthful. Protects the skin from bad UV rays. BISH!

Coconut Cream – Helps smooth skin for a radiant appearance.  Helps improve skin sagging,wrinkles and age spots. BASH!

Cinnomon – Anti-inflammatory. Protects the body against skin damage. BOSH!

Cayenne pepper –  Rich in Vitamin E as well as Vitamins A and C which help fight preventing the breakdown of collagen apparently! DOUBLE BOSH!

Ginger – Stimulates circulation. MAKE THAT TRIPLE BOSH!

IMG_7135

Perfectly paired with my healthy Chocolate Cake fingers.

 Young Hottie’s Hot Choccie

This recipes for one

Ingredients

2-3 tsp Cacao or best quality dark Chocolate drinking powder.

 4 tsp Coconut cream (I get mine from Waitrose as they do little tins)

200ml Unsweetened Almond milk ( or whichever you prefer)

2 tsp Maple syrup

half tsp Ground Cinnamon

half tsp Ground Ginger

 Big pinch Cayenne Pepper

IMG_7131

Method –

-In a small saucepan simmer your Milk of choice.

-In a small bowl or cup add the cacao, ginger, cayenne pepper, cinnamon.

-When your milk has just reached warm add just a little of the warm milk  to your little dry ingredients bowl and mix with a teaspoon rapidly to dissolve the dry mixture so there are no lumps in your hot chocolate. It will make a pourable paste (we want it like a smooth chocolate sauce consistency)

Pour your chocolate sauce into your simmering milk as well as adding the Coconut cream and Maple syrup

– Next Pour the velvety Hot Chocolate into your favourite mug and pimp up as you wish. I went a little over the top and grated Dark chocolate, Marsh mallows, Coconut, Cinnamon  and Rose petals (it was a special day).

IMG_7132

IMG_7138

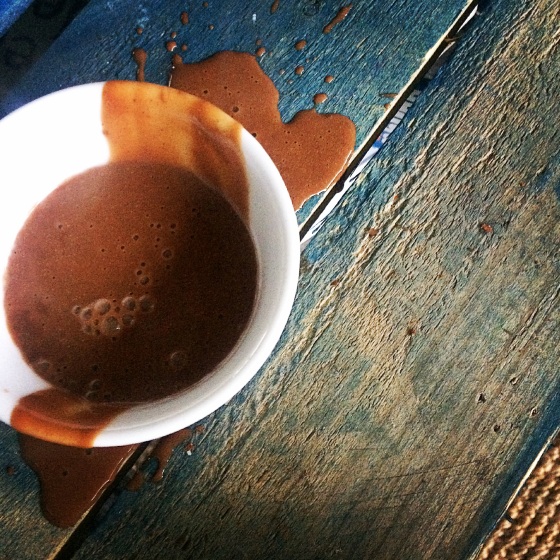
I had a great time photographing this, drinking it, dipping healthy chocolate sponge fingers in it and making a total mess!!


IMG_7137

Messy Puppy!!!


Enjoy your Hot Chocolate with total abandon as I did and feel EUPHORIC about it’s anti-aging, disease fighting, stress reliving qualities.

I would love to see your Young Hottie’s Hot Chocolate creations – tag me or #feedmebeautiful on instagram.

Instagram – @thecakediariesofficial

Twitter – @thecakediaries1

Treat yourself well,

The Cake Diaries

xoxo


Breakfast Beauty Jar

 “In 2016 it is my mission to improve the condition of my skin, nails, hair and creative brain NATURALLY. I have spent a small fortune on all sorts of lotions and potions and never found that ‘magic tonic’. So I’m putting away my wallet and getting out my mixing bowl. Through exploring my love of healthy dessert making, I will be feeding myself beautiful (hopefully). Follow my diary of tailor made desserts, baked snacks and Breakfast recipes for clear skin, glossy hair and hard ass nails. Starting with…”

THE FACE

The Beauty Jar aka The Smoothie Granola jar

Turning breakfast into a one stop beauty shop!

IMG_6898

I can never choose what I want to eat for breakfast more. If my stomach would allow it I’d start with Homemade Granola, then Scrambled eggs with Smoked Salmon and Avocado on Rye, then a smoothie bowl of frozen fruit and veggies with all the toppings, then I would finish with a stack of buckwheat pancakes with cascading berries and dripping almond butter. For this next post I’ve up 2 of my favourite breakfasts together and used my all time favourite toppings. Fear not, I haven’t chosen to add the smoked salmon and scrambled eggs. I have eaten some pretty strange concoctions in my time but…

IMG_6901

Why the glass? I eat with my eyes, I eat with my eyes, I eat with my eyes!! The more beautiful and special it looks the more we want to devour it. If your new years resolution is to eat healthier and that sad bowl of Muesli hasn’t got you salivating then pimp it up in your favourite glass and top it up up up!

IMG_6728

Feed me beautiful facts  – What’s it good for?

Blueberries – Helps to prevent signs of aging. The mass of antioxidants in this mighty fruit kick some serious Free Radical ass (Free radicals are unstable oxygen molecules created in the body from pollution, smoking, fried food). WHAM!

Spinach – Helps you ditch that frown and relax with the right antioxidants and Vitamins to help with anxiety and good sleep, not for getting that all important collagen that keeps the skin looking plump and young. BOSH!

Yogurt – Promotes clear skin by destroying bacteria and germs in the body. POW!

Sunflower seeds – Moisturizes and gives you that glow factor  with rich vitamin E and minerals to help maintain elastin’s in the skin. OOSH!

IMG_6910

Breakfast Beauty Jar

This recipe is for 1 but double it up like I did for 2.

Bottom layer – Thick Smoothie Feed me beautiful facts  

2 handfuls Frozen Blueberries

2 Handfuls of Spinach

6 tbsp Water/Almond milk

IMG_6912

Middle LayerYogurt

Full fat Greek Yogurt or any delicious thick dairy free Yogurt

Middle Layer 2Granola for one or double it and share

4 tbsp Oats

2 tsp of seeds (I went for one Pumpkin and one Sunflower seeds)

1 tsp of Mixed Spice or if you don’t have that try cinnamon ad ginger mixed.

2 tsp of ground nut oil (or coconut)

1 Tbsp of date syrup (I used this as it has a strong flavour and colour but if I didn’t have it in the house I’d go for Maple syrup).

IMG_6911

Topping 1Peanut vanilla Spread

1 tbsp Crunchy Peanut butter

7 Drops of Vanilla essence

1 tsp of your favourite Sweet Syrup I went for something milder than the date syrup Brown rice syrup, Maple or honey.

Tip Top – All the toppings

Raspberries

Shredded coconut

IMG_6897

Method

 Start with the Granola.

Pre heat your oven to 160.c. Fan 140.c

In a roasting tin throw all the ingredients together and combine well with the liquid ( I like to do it with my hands as it’s just divine to eat the mixture off your fingers when finished). It gives me a lovely sense memory of when Mum would make Granola when I was a child and Dad and I would sneak into the kitchen and eat as much as we could while her back was turned before it went into the oven.

Bake in the middle of the oven for 7 minutes

IMG_6908

Smoothie Makin’

In a blender add all the bottom layer smoothie ingredients.

We want it quite thick so the yogurt sits nicely on the smoothie and is easy to eat with a spoon, plus it looks lovely all layered up which is pleasing to mine eye!

Now you are ready to layer up. Using a nice clear jar or favourite glass.

IMG_6900


I would love to see your Breakfast beauty Jar creations – tag me or #feedmebeautiful on instagram.

Instagram – @thecakediariesofficial

Twitter – @thecakediaries1

Treat yourself well,

The Cake Diaries

xoxo

IMG_6909


Radiance truffles.

 “In 2016 it is my mission to improve the condition of my skin, nails, hair and creative brain NATURALLY. I have spent a small fortune on all sorts of lotions and potions and never found that ‘magic tonic’. So I’m putting away my wallet and getting out my mixing bowl. Through exploring my love of healthy dessert making, I will be feeding myself beautiful (hopefully). Follow my diary of tailor made desserts, baked snacks and Breakfast recipes for clear skin, glossy hair and hard ass nails. Starting with…”

Radiance Truffles aka Chocolate Sticky Fig Truffles

Today I’ve whipped you up a recipe to help with skin radiance using Almond and raw Cacao.

IMG_6832

IMG_6833

I’m all for a life of balance. But just a week into January I’m missing those dreamy Christmas afternoons tucking into a box of special chocolates in front of the T.V (usually a praline or truffle situation). I love their velvety texture. Now I’m back to ‘real life’  and can no longer justify not seeing the light of day for days on end and living on a diet of strawberry creams and roast potatoes I am looking for a treat which makes me feel like I’m having a really special indulgent experience but doesn’t make my face look like a pin cushion and my body and mind feel like a lethargic slug. So here’s the balance bit –  Radiance Truffles aka Chocolate Sticky Figgy truffles. These feel so special with a lovely chewy texture and deep coco flavour. Plus as soon as that sweet tooth hankering begins you can whip these up in 5 minutes flat.

IMG_6796

IMG_6829

Feed me Beautiful Facts Whats it good for?

Figs –  more fibre than other dried fruit helping us to feel fuller for longer. Figs have 15% less sugar than dates (so if you are watching your sugar in take you can swap out dates for figs in most recipes).

Cacoa –  Don’t get me started, (I’ll keep this short)! Big on Antioxidants which protects the skin against aging and Vitamin C which helps protect our skin. Fatty acids to help heals wounds and scars

Almonds – One of the best sources of Vitamin E – Skin radiance. Increases Energy.

Dates – Mood Regulating IMG_6830

IMG_6831

Makes 8  Truffles

Ingredients

80g Almonds

4 Dried Figs

4 Medjool Dates

4 tbsp. of Cacao  and a little extra for rolling (or best quality cocoa)

IMG_6828

IMG_6795

Method

In a food processor blitz the nuts until ground down into a nutty flour.

Throw in the rest of the ingredients until all is well combined.

Scrape out the mixture and on a wooden board roll into 8 balls.

On a wooden board sprinkle 2 tsp of Cacoa over the surface and roll the Figgy Truffles in the cacoa.

Hay presto! You got some super food truffles in 5 mins.

Keep them in the fridge. These can be frozen for a week or so.

A treat that your face, body and mind will love, especially your taste buds!

IMG_6745

Currently, these go where I go!

I would love to see your radiance truffle creations tag me or #feedmebeautiful on instagram.

Instagram – @thecakediariesofficial

Twitter – @thecakediaries1

Treat yourself well,

The Cake Diaries

xoxo


Edible Christmas labels

Today I am sharing an excerpt from a post from last year. Light and buttery, melt in the mouth chocolate labels to make the Christmas tree extra special or jazz up a gift!

3 days to go! Still not got all the Christmas shopping done? Feeling stuck for gift ideas? Feel the panic rising as you wish you’d thought about all of this at the beginning of December instead of 3 days  before Xmas??!!

I swear, that yesterday was December 1st but when I woke up this morning and started packing my suitcase for Christmas away I had to admit that it was definitely the 22rd of December and in a blink of an eye a whole month had whizzed by. If you have woken up to the 22rd Dec in a breathless panic fear not and read on!

I am calming myself down by writing, baking and getting back on track. Here we go!

IMG_3972

I like nothing better than giving gifts but I feel like I have exhausted all present ideas this year. I want to give the people I love in my life something that is original, thoughtful and most of all wanted! There is nothing worse that receiving a gift that there is either no room for in the house, that is whacked on ebay the minute the gift giver has walked out the front door or that hangs around the house for the next couple of years hidden in a corner only to see the light of day when said gift giver pops round. So I am baking gifts this Christmas knowing that each one is personal to the friend or family member I am giving it to. Plus it can be shared with others too. The love goes a long way!

Instead of slugging it down Oxford street, battling it out with the cold and all the other desperate shoppers stay at home, put the heating on, drink tea and listen to the radio while you tailor make a treat for someone you love. For an even more thoughtful and cost effective gift you can box and wrap them in things you make or design using bits and bobs from around the house. Some of these can even be hung on the tree and you can get the kids to help you too.

To wrap and box my presents I am using cellophane bags (these can be bought from any of the cake craft companies on line and egg boxes which I have painted in vintage white with tons of ribbon.

IMG_3971

 These are great fun to make and a number of them accidentally got broken which meant I had to keep eating them as I went (it’s so hard doing my job!!) Light, crumbly and buttery, dipped in Orange dark chocolate for the adults and milk chocolate and dusted with glitter for the kids. I will be having a glittery one this year as at Christmas I revert back to about 10 years old. It’s a funny thing. It usually starts when I am sent to sit with my cousins on an old picnic table that has been brought in from the shed and is masquerading as the other half of the dining table. We sit on stools or old boxes of books pretending to be chairs and pretending (not very well) at being comfortable! It’s the kids table but the problem is we are now all between 21 and 32.

I will be hanging these on the tree the night before Christmas so that first thing in the morning we can pluck them off and eat them before breakfast! So you will need some ribbon for this! If you have a piping bag you can write names on the biscuits and actually use them as gift tags on your wrapped gifts to makes them extra special.

These are from a lovely little recipe I saw in Jamie Oliver’s Magazine last Christmas. Make these on Christmas Eve with any young cousin’s, nephews or daughters that need amusing. Or in my case the boyfriend!!

Ingredients – (makes about 20 ish)

300g Plain four

150g caster sugar

250g butter (room temp)

1 egg yolk

1tbsp milk

(1tsp) vanilla extract

200g Dark Chocolate Orange and 100g Milk Chocolate.

Ribbon

Edible Glitter or anything else you would like to decorate with.
Method –

1 – Preheat the oven to gas 180°C

2 – In a large mixing bowl whip together butter and sugar until smooth and fluffy .

3 – Beat the egg yolk, milk and vanilla in a jug/bowl and add to our butter/sugar mixture.

4- Add flour and mix until we bring a dough together.

5 – between 2 sheets of baking paper roll out the dough to just under 1cm thick. Cut shapes out with your label cutter. Now to make the holes to thread your ribbon through. After looking through the cupboard with my friend while considering many different baking tools she suggested the end of a birthday candle to make the holes. They are perfect! Otherwise if you own a skewer that would do (but a bit trickier).

6 – With a pallet knife lift biscuits on to a lined baking tray. Bake for 20 minutes golden in colour (make sure to whip them out before the edges start to deepen in colour) we want a nice even colour. Place on a cooling rack.

7 – Melt the each chocolate in the microwave for 2 mins, checking twice and stirring.  Dip half of each biscuit in the chocolate. Let the excess drip off then place on a sheet of baking paper. Leave to set. With my glitter  and milk chocolate labels I dripped chocolate with a tsp back and forth over half of the biscuit.

8 – When all set grab your self some Christmassy ribbon thread through each biscuit label and hang on the tree!

IMG_3977

Have a wonderful Christmas and a really positive and feel good beginning

to 20016.

Treat yourself well.

Yours truly,

The Cake Diaries xoxo

Summer Party Desserts

Processed with Moldiv

My go to party sweets


My party piece round up

No, I’m not talking about my ability to blow Malteasers into the air or to do the splits whilst balancing a plate on my face or my running man on the dance floor. I’m talking about the kind of treats perfect for a party.

IMG_5409

Mini Vanilla Doughnuts with dark and white chocolate

IMG_5322

It’s summer, you’ve invited friends round and it’s inevitably going to turn into a bit of a party. Forget the plates of cake balancing act. The awkward hand swapping dance, glass, plate, fork, napkin malarkey.

IMG_5336

Double Chocolate Cake pops

IMG_5337

For my events this summer I have been making treats which are pretty, fun, quick to eat and can easily be eaten while holding a glass of wine in your hand. TOP TIP! Make it small or put a stick in it and it becomes the perfect party dessert which equals less lip stick smudging! All of these desserts bar the Banana Popsicles (because they will melt) can be stored easily to take out and about or to a summer festival.

Here’s my party treats instagram round up!

Quick Banana Popsicles

IMG_5343

Frozen Banana, Chocolate Popsicles

IMG_5344

This is the perfect sweet treat for a BBQ.

Ingredients/What you need – Banana’s, 85% Dark chocolate, Walnuts and Vanilla pods, pop cake sticks or wooden skewers and baking paper.

Method – Cut ripe banana’s in half. Insert pop cake sticks or wooden skewers into the base of the banana’s about half way up so they feel secure. Store banana’s in a plastic sandwich bag sealed well and freeze over night.

Crush a handful of Walnuts. In a pan toast them over a medium. Keep an eye on the them and stir regularly to stop them from catching.

On a board with a small sharp knife slit a Vanilla pod down the middle of it’s length. Scrap out the vanilla paste out of it’s insides and add to the toasted nut. Sprinkle Cinnamon into your nutty vanilla mix and stir in.

Melt Chocolate in the microwave or in a glass bowl over a pan of boiled water. Keep stirring until all chocolate has melted. As soon as the chocolate has melted turn of the heat or it will burn and turn lumpy.

Dip the frozen banana’s in the chocolate and sprinkle the nutty mix over the top. Lay your decorated banana’s on a board covered with a sheet of baking parchment and stick these back in the freezer until set (about 5-10 minutes). When it’s party time  – enjoy!

IMG_5027

Healthy Caramel and Black bean Brownies

IMG_5031

If you have a little more time and friends with dietary requirements these are a great indulgent treat that look  impressive but very simple to do. Healthy, Vegan, wheat and gluten free. If you would like to make these you can find my recipe here –

http://thecakediaries.com/2015/05/14/caramel-and-chocolate-black-bean-stacks/

Enjoy your summer and pimp it up  a party with some of these festive summer treats. If you haven’t got the time and need your treats a-sap you can order from me at the Cake Diaries thecakediariesofficial@gmail.com

Treat yourself well,

Yours Truly,

THE CAKE DIARIES…


Chocolate Doughnut recipe #razzforlife

IMG_5462 Last night I went to a very special event #razzforlife a Charity Fund raiser for Cancer UK  hosted by the very lovely Fiona Longmuir (theescapologistsdaughter) which I had the pleasure of supplying the sweet treats for!! If you attended the #razzforlife party last night you are now most possibly a firm friend, nursing a little hangover and after tucking into your goodie bag have now followed this link for a Chocolate Doughnut recipe made with you in mind! ( I have a feeling that we may have kicked some Cancer butt last night too with all our fund raising and positive vibes!!)

IMG_5467

With my swag!

IMG_5444IMG_5445#RazzForLife Chocolate Doughnuts with Maple butter Icing

These Chocolate doughnuts are light and fluffy goodness packed full of antioxidant rich and nutritious loveliness. Saying F**K CANCER with every bite!

IMG_5446

Banana bread and dark chocolate doughnuts made for my #razzforlife Kebabs.

Ingredients – Make 16 mini Doughnuts

120g Ground Almond flour

120g Cacao or Cocoa

2 eggs or egg replacer

2 tbsp Apple Sauce

2 tbsp Oilve oil or Coconut oil

Just under half tsp Baking Powder

Just under half tsp Bicarbonate of Soda

4 Tbsp of Maple Syrup (or quality honey)

1 tsp of stevia or natvia (or another tablespoon of Liquid sweetener i.e Maple syrup)

1 tsp Vanilla Essence

IMG_5449

Method – Preheat oven to 175.c

0 – Grease a mini Doughnut pan or turn on your mini doughnut oven

1 – In a mixing bowl chuck in all dry ingredients.

2 – Chuck in wet ingredients (a part from the eggs) to your bowl of dry and stir as you go, slowly.

3 – Whisk your eggs in a small bowl and then add to your batter.

BAKING TIP!! Don’t leave your batter after making it. Get it straight into your tin as the magic of the bicarb and baking powder is getting to work by adding air to your batter help it rise.

4 – Add your mixture until each doughnut cell is 3/4 (as we want these babies to grow!!)

5 –  Bake in the oven for 15 mins or until a skewer comes out clean. If you have an mini doughnut oven they take 6 mins on high. (P.S I hear these doughnut ovens are about £15!!)

6 – Take them out of the oven and give them 5 mins to chill out before turning out on to a cooling wrack.

Mable butter Icing  with toasted walnuts and Pecans.

– 1 tbsp Smooth Peanut butter. I use Meridian is it is sugar free, salt free and palm oil free.

– 1 tbsp of Mable Syrup. (you can decide how stiff or liquid like you want your icing by adding more Maple syrup)

– Mix it together in a small bowl. With a knife ice your cooled doughnuts

– Take one handful of nuts and break apart (if you are having a bad day put them in a clear

plastic bag and bash with the back of a wooden spoon.

– In a frying pan – toast your nuts for 3 or so mins over a medium heat.

– Decorate the iced doughnuts with the toasted nuts

– Leave in the fridge for 10 mins to set or just scoff the lot!

IMG_5448Treat yourselves well.

Yours truly,

The Cake Diaries

Caramel and Chocolate Black bean Stacks

IMG_5027

What’s better than ultra soft and chewy brownie? Or gooey sticky caramel? The sound and feel of dark chocolate cracking between your teeth as you bite and the crunch of candied nuts dusted with shredded Coconut? Well…? I’m waiting! Exactly as I thought. Nothing! Four of the best things in the world all stacked up on top of one another. Heaven!

IMG_5031

I love these little stacks and I like to take them everywhere with me. They are more robust than cake, so sticking them in a plastic tupperware and going out and about with them is fine. If you have kids they could probably run around with these without wondering what that gooey brown blob stuck to the top of their Lunch box lid use to be! You open up the box and they always look like “What? I woke up like this” kind of treats. These are a fabulous alternative to a Twix or Snickers bar. Don’t get me wrong, who doesn’t like a Snickers every now and again? But what the hell is in there? What are all of those mysterious names in the ingredients list? I don’t know about you but I refer to know what is about to travel though my body. What ends up in my tummy? What’s being absorbed into my blood stream and what do I get out of it in the end? (Queue toilet Humour!!) But seriously, is one of those many mystery names something that aggravates cells which will one day be bad for my health if eaten time and again? That’s why I’m a do it yourself kind of girl when it comes to the sweet stuff. Whether I’m making a cake full of butter, Sugar, and cream or a gluten free, sugar free treat. I know when I take a bite what’s about to go into this temple!!  Not to come across all sanctimonious but your body really is a Temple…Castle, Palace, cottage by the sea, whatever you want to call it.  You’re not renting it. It’s yours. You’ve got the keys. You are a property owner gorgeous, congratulations! I always feel that it’s the only thing in life I am truly in charge of and it is my decision how I want to treat it. Sure, there have been times when it felt and looked more like a run down, out dated semi detached. But I prefer it mostly Temple. In fact I’ve come to like it here. So with all that in mind I am sharing with you an old favourite. My Raw Caramel and Black bean Stacks!

FYI

In my ingredients list you will see a Refined Sugar alternative called Natvia. Natvia is not an artificial sweetener but a mixture of 2 different leaves from a plant which has a sweet taste. The reason I use a little of it here is that unlike most sugars it does not effect your blood sugar levels. It has no calories and comes up zero on the Glycaemic Index. You can use Maple Syrup in place of Natvia if you prefer in the recipe.

Also in this list is Almond butter. You can either make your own (recipe for Almond butter in last blog post below this one) or use I suggest Meridian. As it has nothing but nuts and a little salt in it.

Ingredients -Makes 6 Stacks

Black bean Brownie base

6 tbsp Black beans

2 tbsp Raw Cacoa Powder

3 Majool dates

6 tbsp Ground Almonds

6 tbsp Gluten Free Oats

Carmel

6 Majool dates

3 tbsp Almond Butter

1 tsp Almond milk (or whatever you prefer)

Chocolate Top

Either melt a bar of your favourite Dark chocolate, 75% and higher in a bowl over a pan of boiled water

Or

if you are keeping your desserts refined sugar free have a go at this –

3 tbsp Coconut oil

1 tsp of Natvia

3 tbsp Cacoa Powder

Crunchy nut clusters

5 tbsp of Cashews and Almonds. I crushed half of the nuts and left the other half whole.

1 tsp Natvia

3 tsp Coconut oil

IMG_5025

Method –

All about that base

–  First you want to soften the dates a little. This will help you when it comes to mixing. Chop your Majool dates and put them in a small frying pan over a low heat. It takes very little time for them to soften so keep an eye on them.

– Drain your black beans thoroughly, especially if they are from a can. The likely hood is that they have been kept in salted water or some kind of brine.

– Add your softened dates, sieved the Cocoa powder, then throw in the Almond flour  and oats in to the bowl. Get a hand blender and a hand  whizz together until smooth. If you don’t have a hand blender or food processor get your elbow grease on and with a wooden spoon push the mixture up against the side and spread over and over until smooth.

–  If you are use to eating Snickers and twix bars etc..You may find that this brownie is not quite sweet enough for you. Add 1 tsp Natvia (Sugar Alternative) or 2 tsp Mable syrup.

– I put my mixture into fairy cake moulds. 1 tbsp and a half to each mould and pack down flat. Otherwise you can also line a small rectangular tin and cut into bars later. Put the raw black bean brownies into the fridge while you make your Caramel.

IMG_5034

Caramel

– In your small frying pan add your dates to soften (over a low heat) for a minute. Then add your Almond butter and combine with a wooden spoon.

If you find the mixture a little stiff add a tsp of milk.

– Now add  1 tbsp of the caramel mixture to the top of your brownies. Then put back into the fridge.

Chocolate top

– Time to get that Saucepan out again lovelies! Give it a good scrub down then over a low heat add your coconut oil. Then the Natvia, Stevia or chosen Syrup. Let it melt down to liquid.

– Now add your Cocoa  1 tsp at a time stirring with a wooden spoon.

-Take the Brownie/Caramel treats out of the fridge and with a teaspoon drizzle on a loaded teaspoon of the chocolate.

Crunchy nut top top

– Ok, Don’t hate me! But you’ve got to get that pan out again. Put a tiny bit of the coconut oil in the pan and toss in the nuts. Half crushed and half whole. Toast the nuts (we are looking for a golden colour) then throw in the shredded coconut and mix together.

– Sprinkle the nuts and coconut on the top of the melted chocolate mixture.

-Put in the fridge again to set for 30 mins.

Now enjoy, indulge and feel good!

IMG_5026

Thank you for reading and I hope you make some fabulous stacks! I would love to see your creations. You can find me on Instagram – @thecakediariesofficial or on twitter @thecakediaries1Treat yourselves well!

Yours truly,

The Cake Diaries


Cupcake design

I love Sundays.

Sundays are for Coffee and for sharing.

Writing a baking blog and sharing my cakey adventures has become such a joyous past time, but I am not originally a blogger. I am home baker and dessert developer baking for both private celebrations and press events.

This time round I thought I’d share with you not a recipe but some of my most recent commissions.

IMG_4394

I was asked by the lovely folk at Tampax to design 50 bespoke cupcakes to celebrate the new Tampax Pearl edition (which you may have seen in the shops recently). After many ideas on colour, style, feel and message we went for piped roses with gorgeous sugar pearls, the Tampax Logo and the Tampax pearl hash tag #PerfectFit

IMG_4393

IMG_4399

When designing a dessert it’s important for me to know about the occasion, the feel of the event, how it’s going to be eaten, when it’s going to be eaten as well as the person who’s receiving it or if it’s for a press event the type of person the product is aimed at. In this case, I wanted to know about the type of gal that buys Tampax Pearl, her lifestyle and her style. With all this info I make a kind of mood board of this person or persons that I’ve never met in my head and instinctively I create straight away. If I over think it it doesn’t seem to work as well.

IMG_4401

IMG_4397

After being displayed at the event each one of these cheeky little fellas went home with a loving journalist.

This commission was brilliant fun for me as I love to decorate cakes. There I was at 3am in the morning hand designing each cupcake armed with a knife, a brush, food colouring, a piping bag and coffee!!

IMG_4396

IMG_4387

In the coming months I shall be putting up cake decorating tutorials on how to pipe buttercream roses with my personal baking tips. Taking your cupcakes and layer cakes from nice to razzle dazzle.

Short and sweet! I have really enjoyed sharing some of my recent work with you and have some great Easter Commissions coming up. Next commission is for an order of my Magic Muffins but the recipe is top secret. They are gooey chocolaty goodness and whenever I’m asked to make them I always make an extra batch to give to friends or eat myself. The best thing about them is they are super healthy but feel incredibly sinful! What could be better?

Keep baking, keep designing and ”treat‘ yourself well!

Yours Truly,

The Cake Diaries xoxo

Stress busting Banana & Rasberry Bread

Healthy Banana Bread, shot through with Raspberries.

If I was to place a personal ad in a newspaper at the moment my name would be ‘Stressed in London’. Yep!

IMG_9988

For the last 3 weeks my days started a little like this –

Up early (I’ve even beaten the sun), I waddle to the tube with too many handbags, a large cake box in hand and my scarf trailing on the pavement behind me as I hop-foot-it through the streets,10 minutes late with a piece of toast hanging out my mouth. Then I’m on a packed tube usually nestled under a sweaty mans armpit in the middle of the scrum. With nowhere to hang on I am desperately trying to clutch the floor with my toes through my shoes to keep me from toppling over. Not a good start to the day and it goes on pretty much like that until I fall into bed at 1am!

IMG_4457I live and work in London and though I love it with all my heart sometimes it can get stressful! There’s a lot going on and oodles of opportunities banging on my door, queuing to get the best seat in my life right now. Now, I’m not taking any of this for granted, it’s  fantastic and I am so grateful. But the only problem is – I haven’t factored in eating or sleeping, eek! If only there was more than 24 hours in a day.

I am one of thousands of stressed out Londoners. The streets of central London are a feast for the senses. Working in the centre of town is a daily emotional Roller-coaster. There is so much to stimulate you in London even if you’re not actively taking part in its angst, joy, frustrations or delights.

Feeling stressed and not sleeping enough means bad decisions get made and we make ourselves feel 10 times more stressed out and anxious. If you are anything like me when stressed out –  you run around like a headless chicken. You forget to eat which eneviably alters your mood and you end up having that that ‘dip’ we know so well.To perk myself up I grab high sugar, high fat foods or caffeine loaded drinks to make myself feel more alive. For 30 glorious minutes I am soaring on a candy covered rainbow sugar high, feeling like I can take on the world. One hour later you will find me shrivelled in a corner rocking back and forth as my blood sugar drops and insulin level rockets. It is never more apparent to me that we ‘are what we eat’ at times like these.

If you are feeling stressed or anxious Caffeine and Refined Sugar feed your anxiety. They are not your friend, they are a double crossing, too faced bully and should be blocked from your Facebook, have their number deleted from your phone and ignored where possible. These are short lived stimulants and when they’ve done their job they will leave you feeling lethargic, depleted and can even make you feel a bit sad 😦

So, I got in the kitchen and decided to design a healthy treat to support you mentally and physically. I can think of nothing more comforting than thick, moist Banana bread.

IMG_4453

In this recipe I have looked at foods that sooth you, lift your mood and that are digested slowly, releasing a steady stream of energy. In my recipe I use Wholemeal Spelt flour (you can use regular whole wheat flour if you prefer), oats, almonds, banana and raspberries for the ultimate mood lifting, stress busting treat.

IMG_4452

Banana bread, shot  through with Raspberries –

Ingredients –

120g Wholemeal Spelt

120g Almond flour

1 egg

3 bananas

2 handfuls of Oat

1 tsp baking powder

1 tbsp cinnamon ( I love Cinnamon and usually go big)

1 tsp Ginger

60ml Maple syrup

60ml Almond milk

Half tsp Stevia

As many Raspberries as you feel.

Pumpkin Seeds for the top.

Method – Pre heat Oven 150.c/ 300f

This couldn’t be easier.

Grease a medium loaf tin (I use coconut oil)

1-  In a large bowl mash 3 ripe bananas. ( The riper your Banana the sweeter and more ‘bananaerie’ the flavour.

2 – In a jug – whisk one egg and add it to your Bananas

3 – Sift in your flours x2, your Cinnamon, Ginger and baking powder

4 – After you’ve mixed in your flour, fold in your oats.

5 – Add your Maple syrup and Stevia.  (I am using Stevia which is a planted based sugar and doesn’t effect your blood sugar levels which keeps you balanced. This is not an artificial sweetener. Stevia is from a plant, so not a scary ‘sugar pretender’ but a very sweet leaf which has been used in cooking for 1500 years!!  If you don’t have stevia you can use 60ml again of Maple syrup).

6 – Fold in the Raspberries. I love to see the bright, sharp colour of the Raspberries smeared through the mixture. (Now I may be getting a head of myself here, dreaming of the seasons to come. It’s not quite Raspberry season. I personally love that sharpness of the Rasberry in contrast to the banana but if it’s too sharp for you add dates instead which are sweet, gooey and just delish!!

7 – Add the mixture to your Medium loaf tin ( Make sure that whatever sized tin you own that you don’t over fill it. We are aiming for using 3/4 of a tin). Sprinkle on your Pumpkin seeds

8 – Bake in the middle of the oven for 50 Mins. As you must be aware by now that using a tooth pick or shape knife inserted into the loaf is the best way to check if the dessert is cooked through. But with this dessert I like to see just a couple of crumbs clinging to my knife as I want it as moist as possible. But this is up to you and how you like your Banana bread.

IMG_4452IMG_4455

Now comes the dreaded bit. Waiting. Before you dig into this bag boy give it 10 mins to chill out in it’s tin. Then with a knife feel your way round the edges to free it from the sides and turn out!

Now dig in!! Cut a big wedge and serve warm with a huge mug of something hot or eaten for breakfast the next morning.  This Banana bread is not a light, fluffy cloud like delight but a thick, moist, filling and healthy pick me up which will keep you going between meals and elevate your mood.

IMG_4454

Beat stress with clean eating recipes, keep happy and treat yourself well!

Yours truly,

The Cake Diaries xoxo

Butternut Squash and Roasted Pecan Brownies.

IMG_4333

Brick lane, London

Judging by all the Valentine hearts that were pasted on shop windows, men in the high street carrying huge paper Michael Kos shopping bags, the ‘make your own card’ commercials on repeat all over the T.V and all the lovely Instagrams and Facebook photo’s, we gave a lot of love away this Val’s day. But this next recipe I have developed and am going to share today is about taking the LOVE IN! It’s all about us.

IMG_4316

The Hoxton Hotel, London

So let’s put the good stuff in and let the good vibes out. Happy, healthy treats that make you feel naughty but then…’oh, it was completely nutritious! Nourishing mind, body and soul and perfectly balanced for a healthy life style. Better eat two then to take full advantage of the goodness’.

If you regularly read my blog then you know I’m a big fan of ‘afternoon tea’. My mission is to bring afternoon tea back to 4pm! To all my friends in Europe and those State side who are wondering what on earth I’m going on about – it’s an old British tradition of coming together and eating cakes and sandwiches at a certain time of day (the afternoon). For a more detailed description of its origins scroll back to my Sweet can be healthy blog with a recipe I have developed for Sugar free, fat free Scones. In fact everyone go and have a look back at this blog post right now (bossy pants alert!) as it’s such a lovely recipe. Spiced with cinnamon and sweetened with shredded apple and dates. It also contains my secret ingredient, avocado! Ok, miss bossy boots is leaving the building. She’s gone. In fact I see her sloping off through the door rather sheepishly. The fire exit, as she is a bit embarrised. Apologies about her. How rude!

Afternoon tea is and was a big part of my life and I try and have it every day, so that between lunch and dinner I am energised all afternoon and stay productive right until I put down my spatula or shut the lap top in the evening. You may feel a little dip at about 4pm, feel fatigued, watching the clock as it ticks slowly up to home time, totally unfocused and lack lustre.

Energise that brain with a healthy, happy, body loving treat. These Butternut squash brownies are soft, melt in the mouth, feel good food. The texture is so chewable and dreamy, it makes the brownie. Texture is half the pleasure of a good brownie and the squash makes it…well squashy. Sorry, I literally can’t describe it any better. You will fully understand when you sink your teeth into one of these bad boys. These may be wheat free, butter free, contain very little sugar and made using a vegetable, but I do not compromise on taste here. This recipe was developed after thinking of the dietary requirements of a friend and thoughts and needs from other friends and family members.

IMG_4321

Butternut squash and roasted Pecan Brownies. Are they healthy? Yes. Clean eating? Yes. Dairy free? Yes. Are they fat/oil free? Yes.  Wheatfree? Yes in deedie. So what’s in them?? This recipe uses butternut squash as an alternative to butter, oats and buck wheat as alternative to wheat and raw cocoa powder, cinnamon, dried fruit and a touch of Carob maple Syrup for sweetness (you can use any naturally occurring sugar you like. This is just my preference)

Why are these so good?

My dreams are made of butternut squash brownies! If I’m not eating them, Im sharing them or thinking of them. Seriously I think I may need professional help. “Doctor, doctor I think I’m turning into a butternut squash and roasted pecan brownie.  I’m turning orange and I gotta gooey centre”.

I’ve got it bad.

I’m in love!

This is a ‘no fear’ recipe that’s simple and quick to make with absolutely no bother. It all goes in the bowl at pretty much the same time. It’s the perfect fix to a 4pm slump or sweet tooth craving. You will need to cook your squash first. You can do this just before you make the recipe or the night before. Roasted Pecans and buckwheat gives this a real smoky taste and the cinnamon is added to compliment these two. Let’s not forget the chocolate. I use unsweetened cocoa powder and a table spoon of 85% dark chocolate for extra depth.

Let’s get started! As I am gonna have a craving in exactly 45mins time.

NOTE – Naturally occurring sugars? Carob syrup, Maple syrup or Date Syrup. You could also use pure honey.

Butternut Squash and Roasted Pecan Brownies – makes 6, bake 25 mins.

IMG_4254

Ingredients

40g Oats

50g Buckwheat (if you are not a fan use Wholemeal Spelt or wholemeal flour)

25g Raisins

30g dates

300g  butternut squash

3 tbsp Cocoa powder

2 tbsp Maple or Carob Syrup

1 heaped tbsp 85% Dark Chocolate (melted)

50g Baked or pan fried Pecans ( no need for oil to pan roast).

MethodPre heat on to 180.c/350.f

IMG_4319

1 – Boil or steam your Butternut squash until mash-ably soft.

IMG_4317

2 – In a large bowl add the mashed Squash and sift in the Buckwheat flour and cocoa powder,

3 – In a food processor add the oats, raisins, dates and Maple Syrup (or whatever naturally occurring sugar you prefer)

4 – Add the blitzed ingredients to the butternut squash ingredients and mix well.

5 – For the nuts you can grab yourself a small frying pan and after breaking up a big handful of pecans toast them over the heat and toss them every so often. As soon as they have started to brown, your done. Or you can grab a baking tray, add baking paper and add the pecans and toast in the oven, regularly tossing and checking or checking and tossing!

6 – After you have added the nuts to your mixture put your dark chocolate in a microwavable bowl and (depending on your microwave) melt for 30 secs or keep checking until the chocolate has just melted.

TOP TIP – regularly check your chocolate and stir. Only melt the chocolate until JUST melted any longer then the chocolate will turn lumpy and gritty. It’s burnt!

7 – Mix in the melted chocolate to your big bowl of deliciousness and do a taste test to make sure your batter has enough chocolate flavour for you.

IMG_4320

8- Add the mixture to a prepared baking tray or dish lined with baking paper and greased. I use coconut oil to grease mine.

IMG_4318

9 – Add the dish to the middle of the oven and bake for 25 minutes.

10 – After 25 mins test with a tooth pick and if it comes out clean we’ve won!!

IMG_4268

Allow to cool if you can bear it and then attack attack!!

IMG_4323I love the way the orange colour of the squash still comes through the deep chocolate. These have great brownie texture which feels like eating velvet. In perfect contrast you get the crunch of the pecan. In the words of Jamie Oliver and Dell Boy ‘Lovely jubbly!’

Lets have a look in close up of this Butternut Squash and roasted Pecan Brownie.

IMG_4322

Butternut squash – Vitamins – A, B, E and K. Minerals – magnesium, manganese, iron, copper, potassium, calcium, phosphorus and zinc. It’s also high in fibre.

Looking for more healthy treat inspiration ? – Check out my Wheat-free, Sugar free Scone recipe, on my Sweet can be healthy blog post that I spoke about earlier.

IMG_3800

My Apple, Date & Avocado Scones

If you are like me and fly out of the house first thing in the morning these might be a perfect breakfast on the go or just a great feel good treat for you. Have a quick look at my Good morning sunshine bars blog.

IMG_3417

Bursting with seeds, nuts and fruit.

It would be great to meet you all. You can find me on Instagram @thecakediariesofficial or Tweet me @thecakediaries1

Stay happy and healthy and know that spring is on his way! He told me.

Yours truly

The Cake Diaries xoxo

Desserts both naughty and nice.

Woah! January where did you go? Last thing I remember was being sat in front of a burning fire place in the deep depths of the countryside with a blanket over my knees whilst balancing a lap top and cup of hot coco, writing my edible Christmas gifts blog!

So… no blog in January. I know, disgraceful! But I promise I have not been resting on my laurels. I had quite a month and I am rather caked out. But my love holds strong!

IMG_4150

January left me feeling a bit like this!

So the purpose of my first February blog is to share with you recipes from my January adventures. Wonderful recipes both naughty and nice – borrowed, adapted or developed by myself. I Love finding new recipes and featuring them on the blog. I own a lot of recipe books written by famous bakers but I think it’s important to support other baking bloggers and there wonderful recipes. I also develop recipes myself and in the strangest of places. My favourite place to write new recipes is on the night bus home!!

January!

The Cake Diaries started the New Year with a wonderful photo shoot and lots of time writing press releases and the like. We had a great time on set eating a lot of cake and generally messing around. But oh, how I missed the safe place of my kitchen that week.

IMG_4143

IMG_4151

IMG_4147

…but I had no reason to worry as the week after I was at London Men’s Fashion week developing new recipes for John Galliano at the Mansion Magiela show.

The order was short notice and needed new desserts designed for a Macrobiotic diet. Macrobiotics is a diet revolving around the eating of grains, supplemented with certain fruit and vegetables. No processed or refined foods.No unnaturally occurring sugar and free of most animal products. Most recipes were developed on the top deck of a night bus, as usual.  It was a crazy rush and had me locked in the kitchen for 2 nights in a row, but great fun and a great success. Here is one of the treats I made for Galliano personally.

Please excuse this rather badly lit photo it was about 11pm at night and I was exhausted. But believe me when I say how comforting this desert was. Beautifully spiced, hearty and healthy. I ate it warm (10 minutes out of the oven) at about 11.30pm with a big glass of milk. I slept so well that night.

IMG_4166

Date and Raisin Tarts – Dairy free, wheat and gluten free, refined sugar FREE!

This will yield 6 tarts. Go for a tart dish similar in size to your own palm. This recipe is a perfect, quick and tasty recipe to fix a sweet tooth.

Ingredients

180g Oats

480ml Almond Milk

150g Pecans

400g mix Dates and Raisins

150g chopped Almonds

2 tbsp Maple Syrup

2 tsp Ground Ginger

1 tsp Nutmeg

1 tsp Cinnomon

1 tsp Baking powder

Method Pre heat your oven 180.c/350.f

1 – Grab your food processor and throw in the almond milk, dates, raisins, maple syrup and all nuts. Blend into a rough ‘spread’ like consistency.

2- In a separate bowl add the oats, all spices and baking powder.

3 – Add the food processed ingredients to your bowl and bring together.

4 – Grease tart dishes with coconut oil or olive oil.

5 – Pack the mixture into the tart dishes and add some pecans to decorate the tart for gorgeousness.

6 -Bake in the middle of the oven at 180.c/350.f for 20 – 25 mins depending on your oven.
Week 3  -The Cake Diaries was picked as one of the lucky few to feature at the Rainsborough Square Artisan food market.

“showcasing a select group of exceptional British and international produce from independent producers to celebrate Fulham’s rich foodie history” – Rainsborough Market.

IMG_4180

IMG_4192

I spent the next week running around London gathering ingredients, designing my stall and branding all sorts of things ready for my first ever stall! (Stressed? Me? Yes, totally!!) Mostly, I ran around in a circle going ‘I don’t think I know what I’m doing’. But enjoying myself immensely. I rewarded myself with practise baking and tasting new recipes like Greek orange yogurt and olive oil cake or pretzel choc chip cookie bars!

IMG_4222

IMG_4223

IMG_4219
It was a great surprise to be asked and I was delighted to be involved. It was a terrific day full of cake, friends and meeting lovely new clients. It was the first really cold day of the year here in London, so forgive me if you came to the stall and found me blue lipped and shaky handed!

Here is one of the recipes I featured on the stall.

Salted Caramel Peanut butter Blondies

These are gooey centred and buttery crusted naughtiness. They were one of the most popular deserts on the stall. It was helpful to have a fantastic coffee stall next to us as these Blondies went perfectly with The Colombian Coffee Companies full bodied, bright and buttery coffee.

Peanut Butter Salted Blondies? I am a nut butter nut. So much so I now make my own as I get the jitters if there isn’t a full jar in house. I love cashew nut, almond butter and hazelnut but especially peanut butter. It will ever have a special place in my heart and stomach! I regularly use it in my baking so when deciding on making Salted Caramel Blondies I just had to get some of my beloved peanut butter in there. Boy does this work! Usually, I would go for the crunchy kind rather than the smooth but the smooth just works so well for a really velvety, luxurious feel to the Blondie. Texture is king here…or Queen.

IMG_4224

Lets get started!

First, lets make the salted caramel sauce. Here I am featuring the recipe from Sally of Sally’s baking Addiction. There are lots of different recipes for this heavenly sauce (Jamie Oliver also makes a nice one) but Sally’s is my favourite. She has a joyful website full of colourful naughtiness.

Find her recipe here. http://sallysbakingaddiction.com/homemade-salted-caramel-recipe/

WARNING! Please be warned, when you add the butter to the melted sugar it spits like crazy so protect your hands with a tea towel and stir like crazy!!

Salted Caramel Sauce Ingredients

(Here I have developed my own Blondie recipe from a base recipe by Girl on a Mission. I am virtually high fiving her now).

200g Light Brown Sugar (you can use Granulated Sugar but I prefer to use unbleached Sugars where I can)

90g Salted Butter

1 tsp Salt

120ml Double cream

Salted Caramel Peanut butter Blondies

250g flour

2 eggs

250g Unsalted butter

200g Light Brown Muscavardo Sugar (packed)

1 tsp Vanilla Essence

2 pinches Salt

1 tsp baking Powder

250g Smooth Peanut butter (I use Whole earth as it’s organic and free from Sugars)

IMG_4273

Method – makes 12

Pre heat oven to 180.c, Line a 13inch x 8inch tin with baking paper

1 – Melt butter in a sauce pan over a moderate heat SECRET BAKING TIP ALERT FOR FUDGY CENTRES (when making something like a Blondie or American style cookie there are a couple of ways to make them ‘Fudgy’. One is to take them out of the oven a few minutes before the recipe describes so they are slightly rawer in the middle or to melt your butter. Due to the water content in the butter when melted it becomes more glutinous when mixed with dry ingredients. Creating  lovely fudgy centre).

2-  Allow sugar to cool off a little. A couple of minutes will do. In a mixing bowl whisk eggs and Vanilla essence together, then add sugar and slowly add your butter while stir gently with your other hand.

3 – Now, the best bit. Add your smooth peanut butter to the wet ingredients and bring together that luxurious velvety consistency I was talking about earlier.

4 – Add your flour, baking powder and salt.

5 -In your lined tin spread out a 1 and a half cm layer of the mixture. Then with a spoon blob on your Salted Caramel Mixture. How generous you are is obviously up to you but to get that caramel flavour really coming through go big.Transforming your Blondie from delicious to true decadence.

Best enjoyed at 4pm in the late afternoon energy dip with coffee or after dinner curled up in front of a gripping drama on the telly box. I recommend Broadchurch (who doesn’t)!

Next Week I will be sharing a new recipe I have developed that I can’t seem to get enough of. I take them everywhere.

Butternut squash and roasted pecan brownies

Dairy free (vegan), wheat free and oil free. Using a small amount of naturally occurring sugar.

These are not to be missed!

Healthy, clean eating, feel good food.

IMG_4268

If you have any questions regarding recipes don’t hesitate to get in touch. I would love to hear from you.

I look forward to seeing you again next time.

Yours truly,

The Cake Diaries xoxo